
I guess many of us have used How old do I look?. It was a demo site from Microsoft to showcase Vision APIs as part of cognitive services. Vision API now can also describe the image and provide even more information about the image content such as genders of people in picture if any, classification of racial/adult content and so on. This is all coming from the booming of neural networks & deep learning with breakthroughs in the last few years. Deep learning is more targeted for computer vision problems but can be applied to many other domains as well.
There are many tools to do deep learning ranging from cloud APIs like Microsoft cognitive service and Azure ML to open source frameworks like TensorFlow, Caffe, and Theano. In this post I will consume a ready-made TensorFlow model from a SharePoint addin. I will not develop & train the network from scratch as this is a time consuming process and TensorFlow community already published some models for common practical problems. TensorFlow is a bit hard and verbose and there are nice abstractions that make it more approachable and we still have the option to develop our custom models if needed. But for our case here I would like to stand on the shoulders of some giants and make use of something tested and trained.
So why do not we just use Azure ML or cognitive services vision API:
- Maybe we have an architecture that is not allowed to call cloud services for security reasons or so.
- The problem we are solving might need a custom model that is not available from providers like Microsoft & Google.
- Some solutions need very fast response so models can be deployed and consumed directly on mobile phones for example.
- An extra tiny benefit of using .NET on linux as we will see.
Problem Description
I like SharePoint search feature for office/pdf documents. You can just dump all your documents and then use search to spot the information you need. For other types of documents you need to add more metadata to the lists/libraries hosting them so that you can find/order them. So our problem is to extend SharePoint picture library to store some metadata (description/caption) for stored images. This can be ideally a SharePoint event receiver that will listen for new images created in the library and add the predicted description to them automatically. I will implement a slightly different solution. We will have a SharePoint addin that will add and extra button to the ribbon to open a popup window. In this window, the current image selected will be shown and by clicking a button we will call a .net core web API hosted in an Ubuntu VM which will use bash to call TensorFlow model and come back with a few expected descriptions. The user will have the option to pick one of them and apply it to a description column in the current picture library.
If you would like to have a sneak peek on the final outcome, it should be as follows:
Design
High level design of this POC is to have a SharePoint addin calling ASP.NET core web API hosted in an Ubuntu VM. The VM will have also TensorFlow installed and that ASP.NET web API will call TensorFlow to predict the image expected description. The POC is very simplistic as we will not secure the web API or use TensorFlow Serving for doing predictions (more suitable for production scenarios). Final result can be used for on premises deployment or in Office 365. If used in Office 365, then we will need to have an Ubuntu VM somewhere like in Azure or AWS to make it accessible on the internet.
Enough chitchat, let’s get our hands dirty.
Prerequisites:
- Windows 10 64bit
- VirtualBox
- VS 2015 with Update 3
- .net core tools
- Office Developer tools
- SharePoint developer site (onprem 2013/2016 or simply Office 365 trial/dev tenant)
1- Create VM to host API & TensorFlow
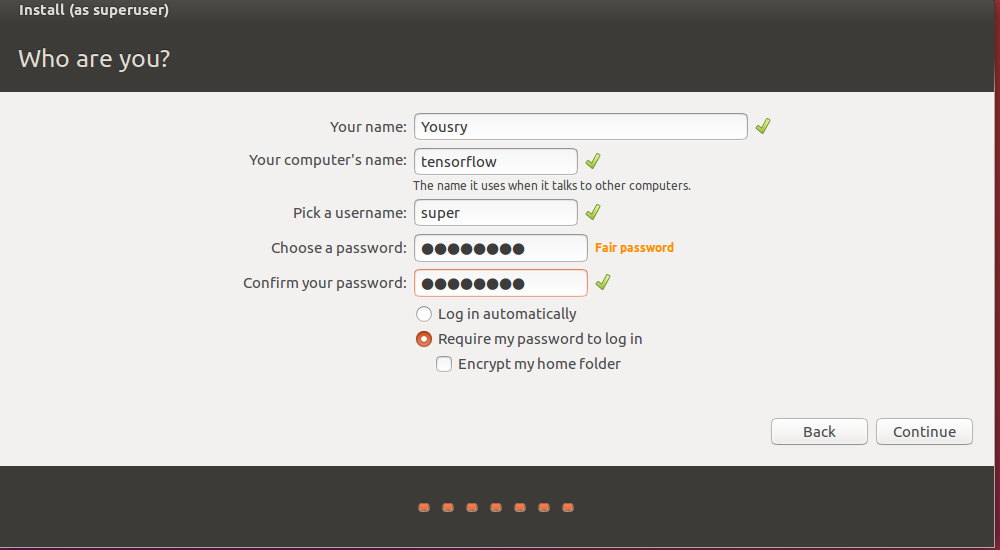
Download Ubuntu 16.04 64bit and install it in a new VM using VirtualBox or your prefered VM tool. There will be some steps later about port forwarding and stuff like that so I prefer if we can stick to VirtualBox to follow same steps. Also I will work in a hybrid approach. Meaning, I will have the VM locally on my laptop (not in Azure) but will work with an Office 365 SharePoint site as I will be browsing the site locally on my laptop then the browser can do XHR calls to my VM. Also, remember to give the VM enough CPU/memory power as the default settings with VirtualBox starts with single CPU and things like that. To make the below steps easy to use, name the machine tensorflow both in VirtualBox and in Ubunto setup and make the user login name super.
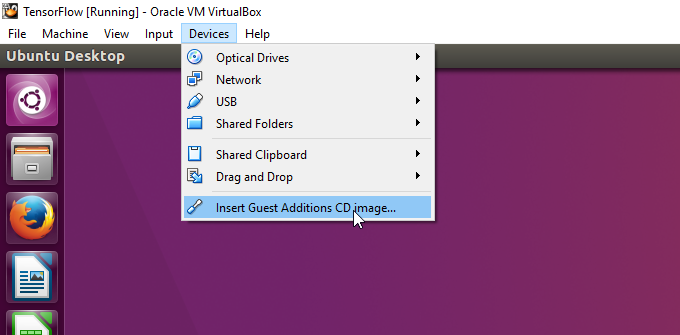
Once Ubuntu is installed, insert Guest Additions CD from Device menu of VirtualBox. You do not have to have any CD, VirtualBox will inject some ISO file and you will get a prompt to install VM guest additions. Restart the VM after this installation.
2 - Install TensorFlow inside Ubuntu VM
Open a bash terminal window and run the below commands:
$ sudo apt-get install python-pip python-dev
$ pip install tensorflow
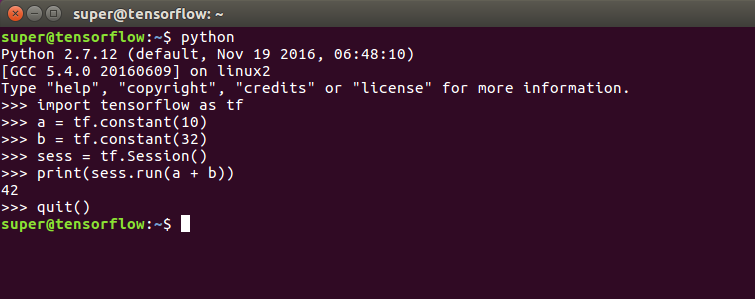
Once the above is complete, you can test TensorFlow installation by running the below script in bash terminal :
$ python
>>> import tensorflow as tf
>>> a = tf.constant(10)
>>> b = tf.constant(32)
>>> sess = tf.Session()
>>> print(sess.run(a + b))
>>> quit()
You should get something like:
3 - Install .NET Core
In a new bash terminal run the below commands to install .net core on ubuntu. The full instructions are documented here
$ sudo sh -c 'echo "deb [arch=amd64] https://apt-mo.trafficmanager.net/repos/dotnet-release/ xenial main" > /etc/apt/sources.list.d/dotnetdev.list'
$ sudo apt-key adv --keyserver hkp://keyserver.ubuntu.com:80 --recv-keys 417A0893
$ sudo apt-get update
$ sudo apt-get install dotnet-dev-1.0.0-preview2.1-003177
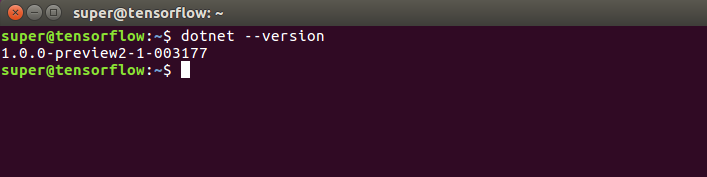
Once installed you can also verify the sanity of the installation by running:
$ dotnet --version
4 - Clone and build VS solution
I have shared a Visual Studio solution containing the following projects:
- A SharePoint addin that acts as a front end to consume Web API
- A .net core Web API project to call TensorFlow model called im2txt.
First clone that repo locally on the Windows machine (host) as we will need to build the solution
git clone https://github.com/ylashin/WhatsInsideImage.git
Once cloned, open solution file WhatsInsideImage.sln using Visual Studio but make sure to open Visual Studio as administrator.
Then open a command prompt and move to the Web API project folder to run the below:
dotnet restore
dotnet build -r ubuntu.16.04-x64
dotnet publish -c release -r ubuntu.16.04-x64
This will build and publish a standalone copy of the web API project that can be run on Ubuntu.
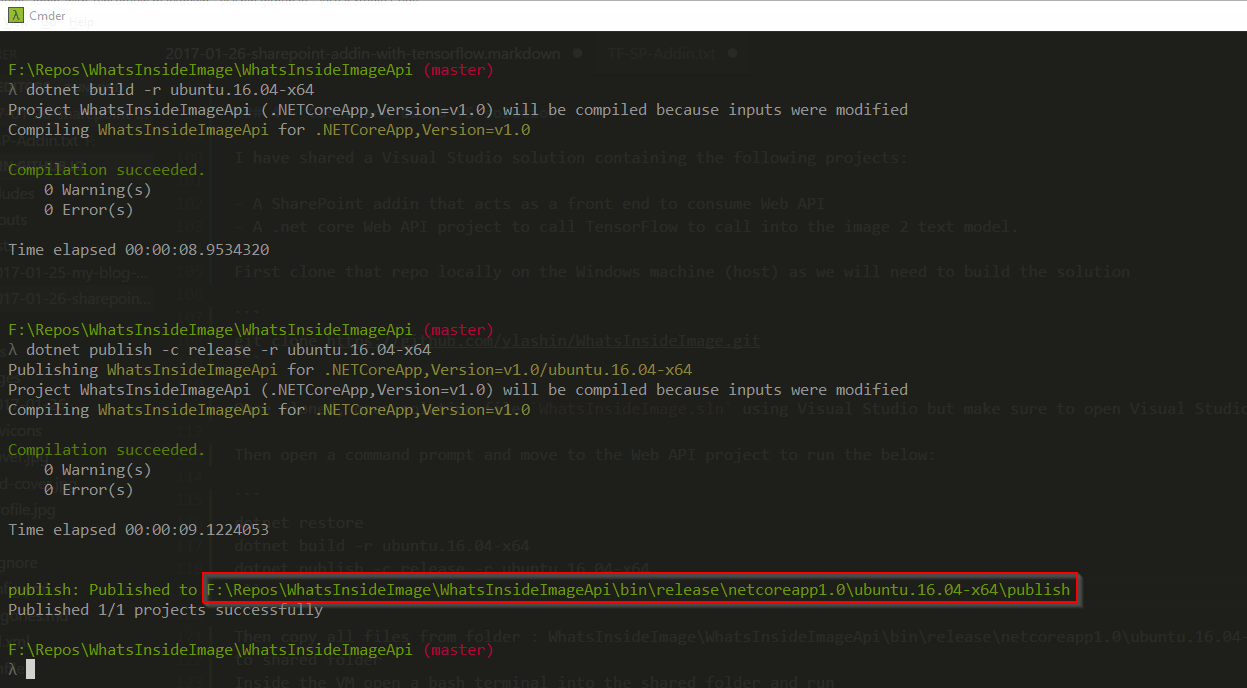
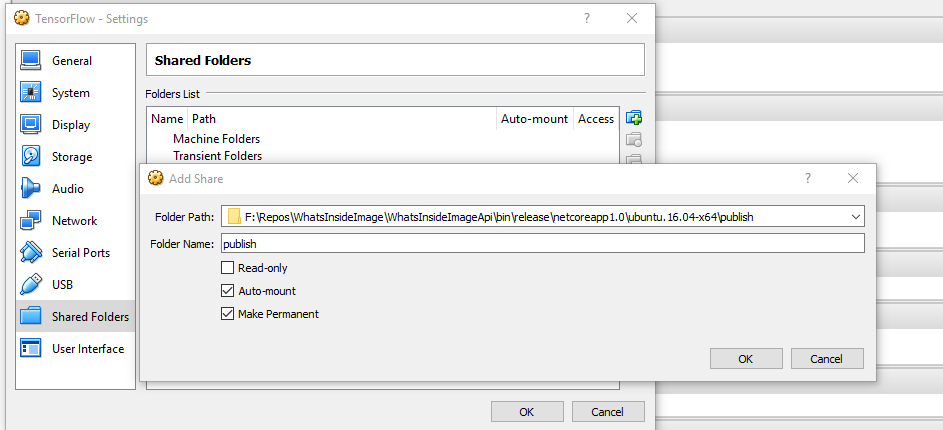
We need to copy the contents of the above highlighted publish folder inside the VM. Another way to simplify that in case we are doing lots of code changes and do not want to do too many manual steps is to map that publish folder to a shared folder that can be accessed inside the VM.
So I will first open VM settings in VirtualBox and add a shared folder named publish to the target publish folder.
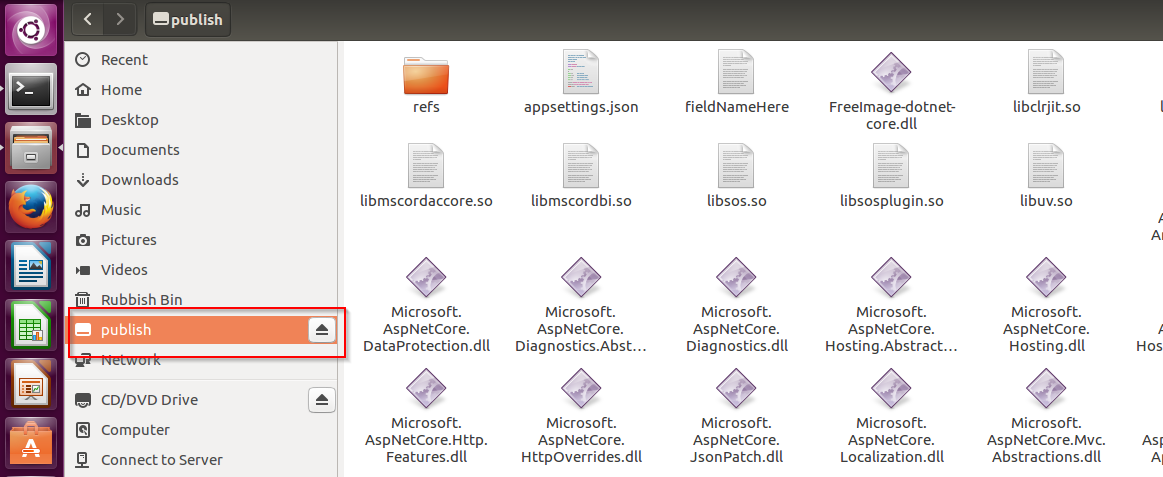
Inside the virtual machine open a terminal and run the below to mount this share to a local folder inside the VM
$ mkdir ~/publish
$ sudo mount -t vboxsf publish ~/publish
The mount command might need to be run every time you restart the VM. With the above you should have a local folder ~/publish that contains published .net core files for our web API, so let us test it and verfiy some hello world thing first.
From a terminal window run the below to fire up our web API which runs in Kestrel:
$ cd publish
$ dotnet exec ./WhatsInsideImageApi.dll
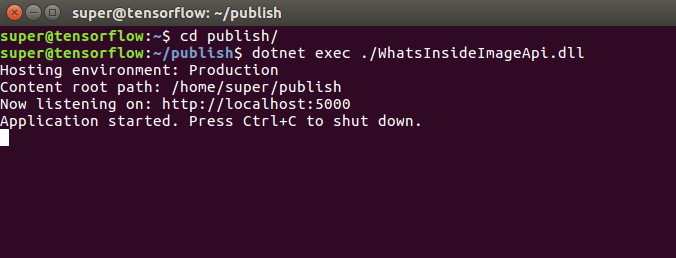 The console shows that the aplication is running and can be accessed on
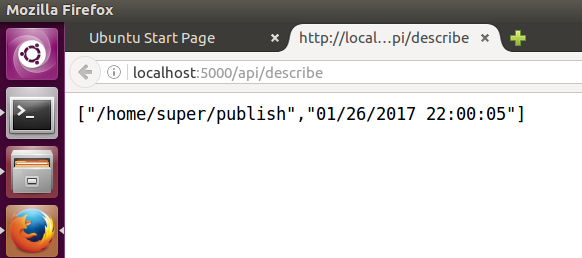
 http://localhost:5000. So fire up a browser and put http://localhost:5000/api/describe in the address bar to verify that the basic infrastructure works fine.
This is just a test endpoint that will echo current working direcotry plus current date
// GET api/describe
[HttpGet]
public IEnumerable<string> Get()
{
    var webRootPath = _hostingEnvironment.ContentRootPath;
    return new[]
    {
        webRootPath,
        DateTime.Now.ToString(CultureInfo.InvariantCulture)
    };
}
The expected output should be:
5 - Expose Web API to host machine
Our next steps is to make this API accessible outside the guest VM. We might think of just disabling the firewall inside Ubuntu and we should be good to go, but in most practical cases no one would be using Kestrel only as the web server. The defacto standard here is to have a something like ngnix and let it proxy our API in Kestrel.
Inside the VM, open our friendly terminal to install nginx:
$ sudo apt-get install nginx
$ sudo service nginx start
We will now configure Nginx as a reverse proxy to forward requests to our ASP.NET application. We will be editing files in /etc folder so we need to run in admin mode
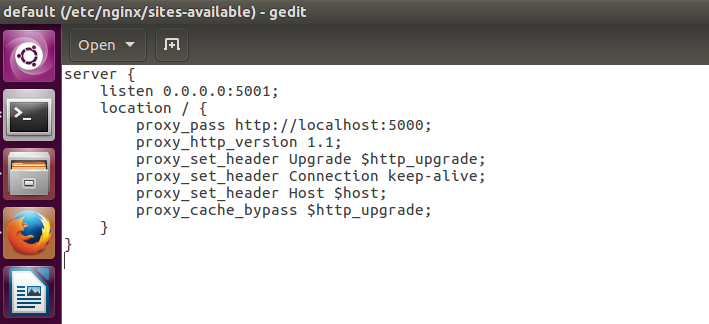
sudo gedit /etc/nginx/sites-available/default
This will open nginx config file for default website in text editor, then we need to replace the server node contents with the following. The 0.0.0.0 means it will listen on any IP or network interface of the VM.
server {
    listen 0.0.0.0:5001;
    location / {
        proxy_pass http://localhost:5000;
        proxy_http_version 1.1;
        proxy_set_header Upgrade $http_upgrade;
        proxy_set_header Connection keep-alive;
        proxy_set_header Host $host;
        proxy_cache_bypass $http_upgrade;
    }
}
Save the file and close the editor then from the terminal run the below to verify config and reload nginx:
$ sudo nginx -t
$ sudo nginx -s reload
Now if you hit the browser with http://localhost:5001/api/describe you should get the same result but this time through nginx.
Then to access the same API from host machine we need to disable Ubuntu firewall as below:
$ sudo ufw disable
Also VirtualBox VMs are created with NAT network adapter type by default in which the host cannot access the guest unless port forwarding is configured. So, from VM settings dialog switch to the network tab and then click port forwarding button to create the below rule. When you click OK, it might trigger some Windows Firewall dialog to ask you to open ports needed on VirtualBox network adapter. You should allow this access for sure to have things running.
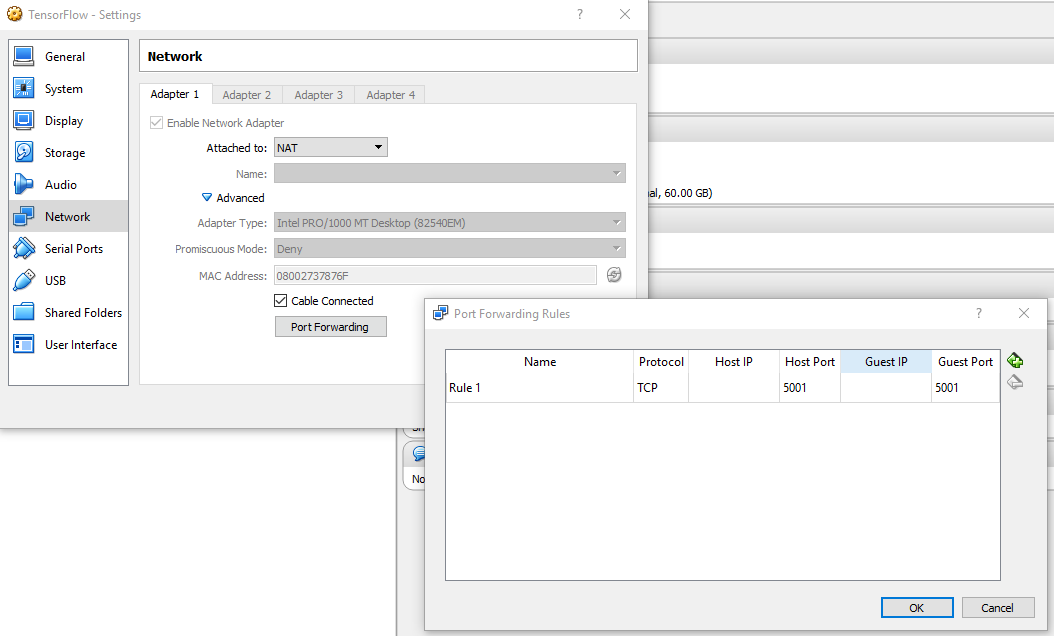
Now if you hit the browser (in your host machine) with http://localhost:5001/api/describe you should get the same result but this time through port forwarding –> nginx –> Kestrel.
If you do not like port forwarding , you can configure the network of that VM to be bridged and this way you can just grab the IP of the VM and hit it remotely. This has a downside of the IP might be different across diffrent sessions on the VM.
By default most web servers like IIS & nginx have default configuration with some settings to limit the size of payload they receive with HTTP requests. For our case we need to relax this setting a bit as we will be hitting web API with image binary contents.
In order to fix this issue, we need to edit nginx.conf file similar to waht we did with the default site config file.
$ sudo gedit /etc/nginx/nginx.conf
Search for this variable: client_max_body_size. If you find it, just modify its value to 20M, for example. If it doesn’t exist, then you can add it before the end of http { … } block.
client_max_body_size 20M;
Save the file and close the editor then from the terminal run the below to verify config and reload nginx:
$ sudo nginx -t
$ sudo nginx -s reload
6 : Install prerequisites for running im2txt model
First let us have some history background about TensorFlow, the below from Wikipedia shows what TensorFlow is :
TensorFlow is an open source software library for machine learning in various kinds of perceptual and language understanding tasks. It is currently used for both research and production by 50 different teams in dozens of commercial Google products, such as speech recognition, Gmail, Google Photos, and search, many of which had previously used its predecessor DistBelief. TensorFlow was originally developed by the Google Brain team for Google’s research and production purposes and later released under the Apache 2.0 open source license on November 9, 2015.
As I mentioned above, Google and the community have shared some useful models on a github repo called TensorFlow Models. One of those models is called im2txt which takes an image as input and returns a few expected descriptions as output, simple enough!
Unfortunately those shared models are untrained neural network definitions. Some nice guys volunteered to do the training and share the final model with the tuned parameters, you can find more details about that in : issue #466
So we will just use some pretrained model mentioned in that issue #466 plus the original instructions from im2txt page to first prepare the model and run it from the shell before consuming it from web API.
We need to install JDK as it is required for Bazel which is Google build tool, so again in the terminal we run:
$ sudo add-apt-repository ppa:webupd8team/java
$ sudo apt-get update
$ sudo apt-get install oracle-java8-installer
$ java -version
The above should show some java version of 1.8.x
Then next is Bazel installation.
$ echo "deb [arch=amd64] http://storage.googleapis.com/bazel-apt stable jdk1.8" | sudo tee /etc/apt/sources.list.d/bazel.list
$ curl https://bazel.build/bazel-release.pub.gpg | sudo apt-key add -
$ sudo apt-get update && sudo apt-get install bazel
$ sudo apt-get upgrade bazel
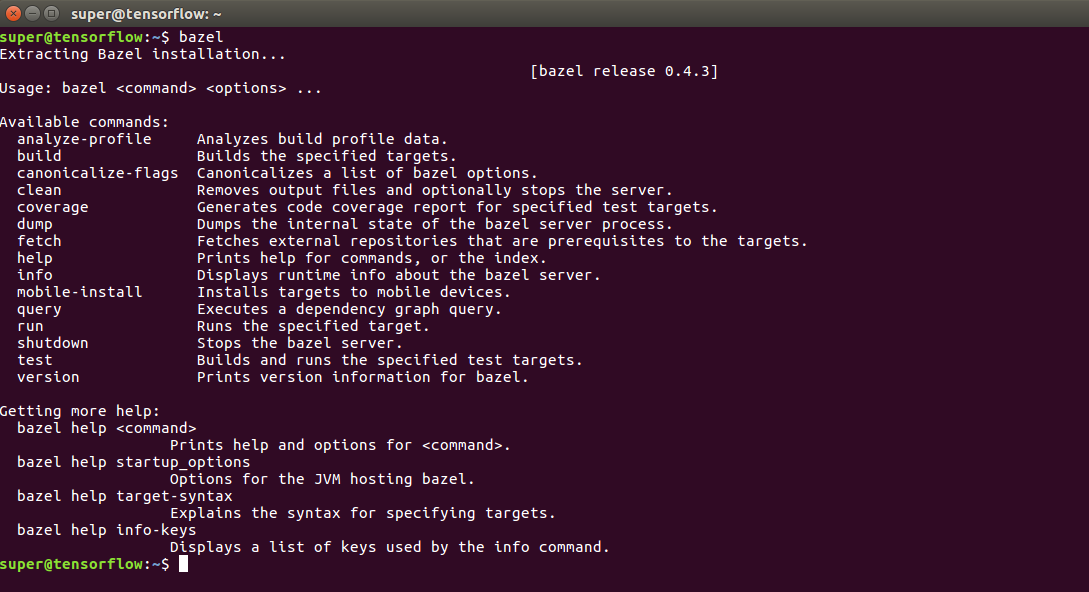
Now if you run $ bazel, you should get some details and version info
Next we need to install numpy & NLTK (probably they are needed for running the training not the prediction).
$ sudo apt-get install python-numpy
$ sudo pip install -U nltk
Install git to allow us to clone TensorFlow models repo.
$ cd ~
$ sudo apt-get install git-core
$ git --version
$ git clone https://github.com/tensorflow/models.git
$ cd models
$ git reset --hard 9997b250
The last line is to reset our repo HEAD to a certain commit as there are some recent breaking changes in TensorFlow & Models repos that will cause some stuff not to work.
7: Prepare TensorFlow model for prediction
In this step we will be following the Generating Captions section of the im2txt page and also the comment by siavashk on 16/11/2016 for issue #466.
So we will start by loading all files to be used for the prediction. Final files are stored on Google Drive as per siavashk comment but I have also uploaded them to the code repo related to this post to be able to grab them easily without the risk of files removed from Google Drive or something. I also updated the vocabulary text file to remove some unneeded quotes as per the comment from @cshallue on Oct 16, 2016. You do not need to do anything of the above all files are shared and ready to be used directly.
$ cd ~
$ mkdir model-data
$ cd model-data
$ wget https://github.com/ylashin/WhatsInsideImage/blob/master/trained-model/graph.pbtxt?raw=true
$ wget https://github.com/ylashin/WhatsInsideImage/blob/master/trained-model/model.ckpt-2000000?raw=true
$ wget https://github.com/ylashin/WhatsInsideImage/blob/master/trained-model/model.ckpt-2000000.meta?raw=true
$ wget https://github.com/ylashin/WhatsInsideImage/blob/master/trained-model/word_counts.txt?raw=true
$ mv graph.pbtxt?raw=true graph.pbtxt
$ mv model.ckpt-2000000?raw=true model.ckpt-2000000
$ mv model.ckpt-2000000.meta?raw=true model.ckpt-2000000.meta
$ mv word_counts.txt?raw=true  word_counts.txt
$ wget http://www.horsebreedsinfo.com/images/fast_horse_riding.jpg
The above just downloads model trained data plus one sample test image we will be using in the next step. Then the next snippet will just compile some inference tool that can be called using a shell command to do the prediction.
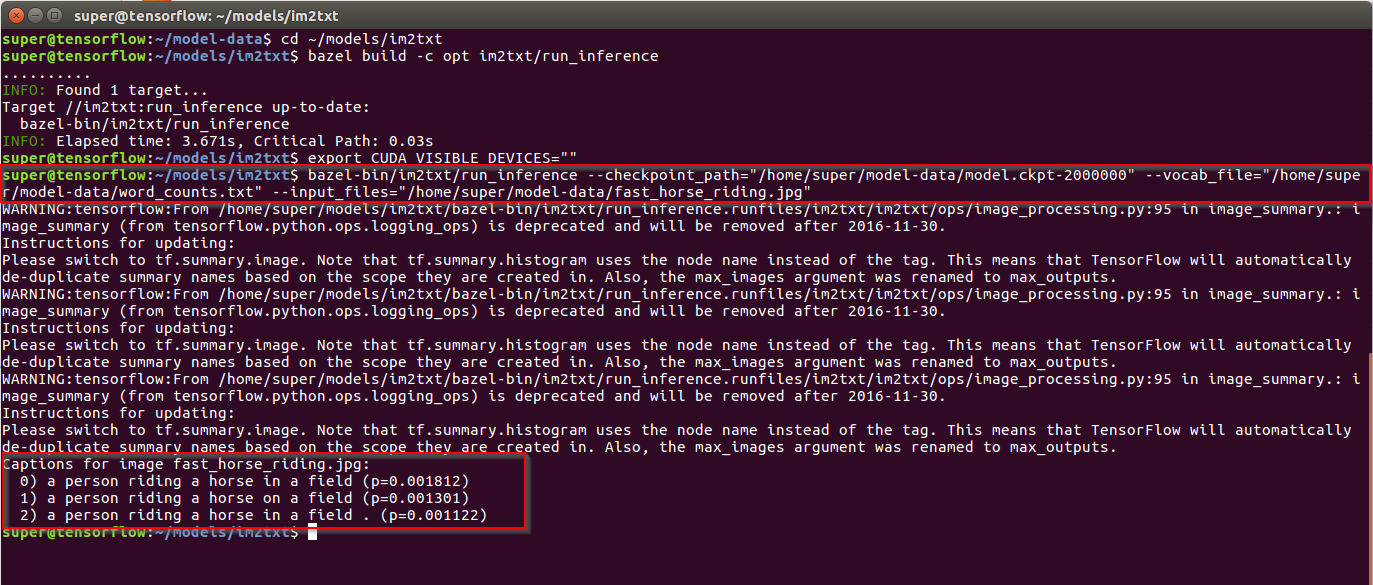
$ cd ~/models/im2txt
$ bazel build -c opt im2txt/run_inference
$ export CUDA_VISIBLE_DEVICES=""
$ bazel-bin/im2txt/run_inference --checkpoint_path="/home/super/model-data/model.ckpt-2000000" --vocab_file="/home/super/model-data/word_counts.txt" --input_files="/home/super/model-data/fast_horse_riding.jpg"
We should see something like :
8: Create SharePoint team site
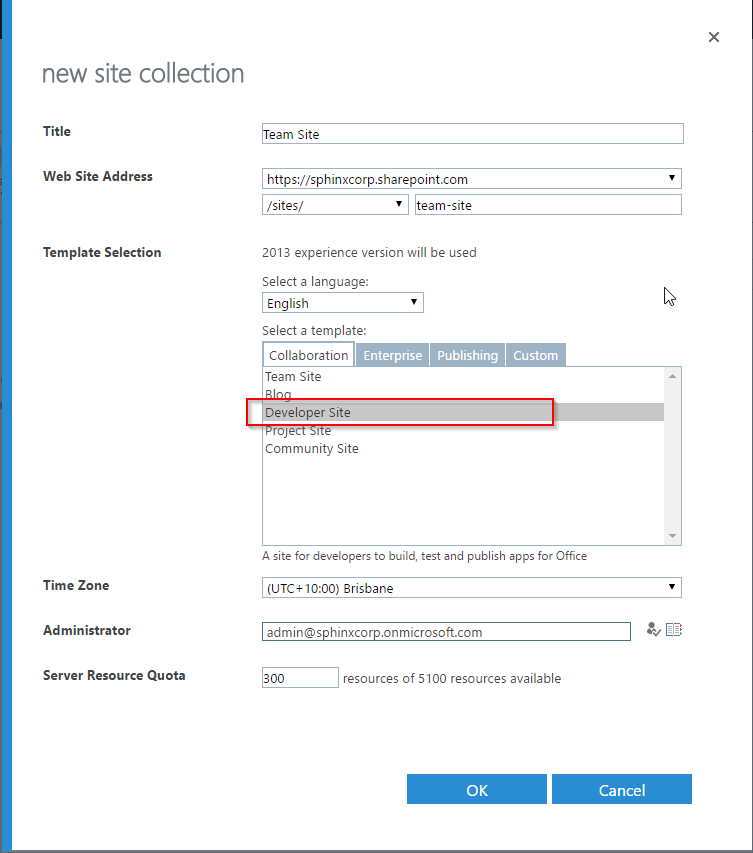
Now we are approaching our final objective, we need to have some SharePoint developer site with a picture library. I will assume that you have an Office 365 E3 trial tenant although any local 2013/2016 deployment will also do the job. I wil open O365 SharePoint admin page and create a new site collection with Developer Site template which will allow us to deploy directly from Visual Studio to a SharePoint site without the need to enable a side loading feature.
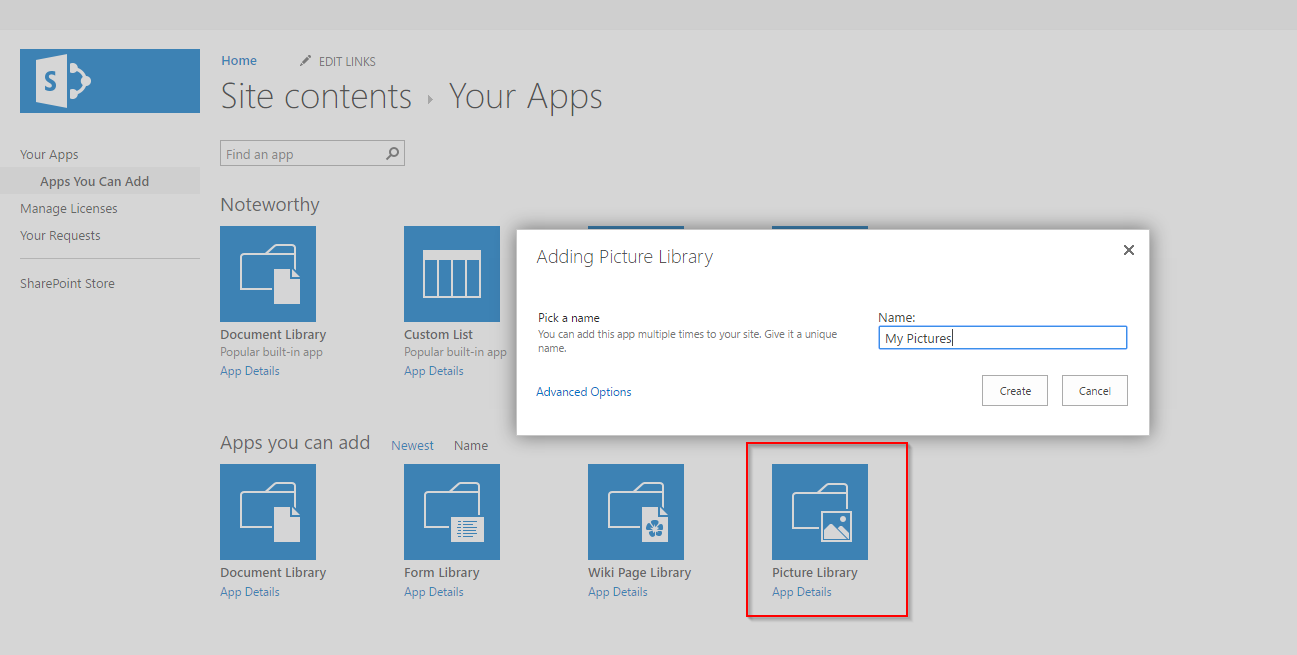
Then once the site is created we can navigate to it and create a new picture library named My Pictures as below then darg and drop a few images in the new library.
The library name is important as it is used from some javascript code to update picture description. I also added a new site column of type text to this library named Caption. This column will hold the new predicted caption of the image.
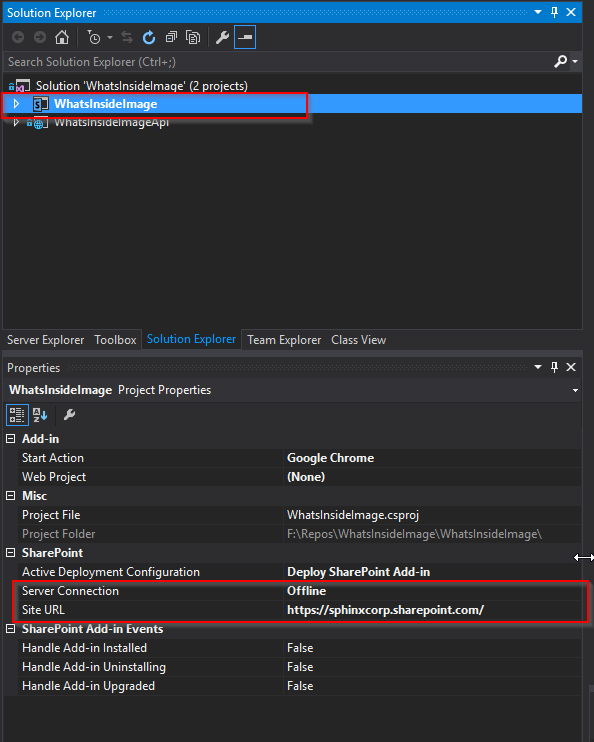
Then open WhatsInsideImage.sln solution file in Visual Studio if it is not open already. Select the SharePoint addin project in solution explorer and bring up the properties pane. Change site URL to your newly created site and Server Conection from Offline to Online. You will be prompted to enter the credentials used to connect to that site.
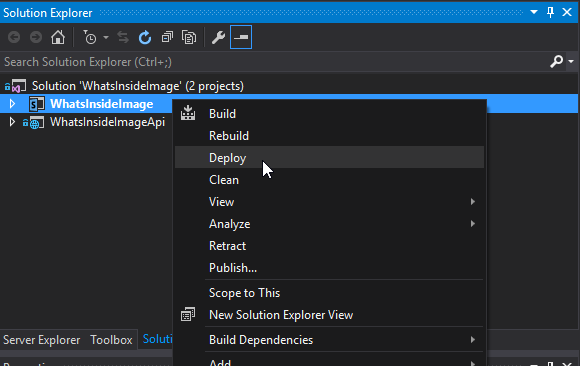
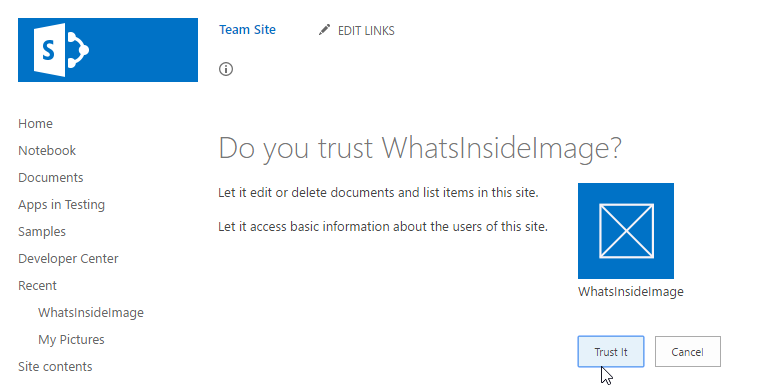
Next we need to right click SharePoint addin project and select Deploy option to deploy it to target site. A browser window will popup to ask user for consent to allow the app to edit stuff in SharePoint as it is supposed to write to list items (our images here) metadata. Once you are happy with the consent, the app will be installed and a default landing page for the app will open. Just return back to the hosting site from the ribbon as we will use the app from the picture library ribbon.
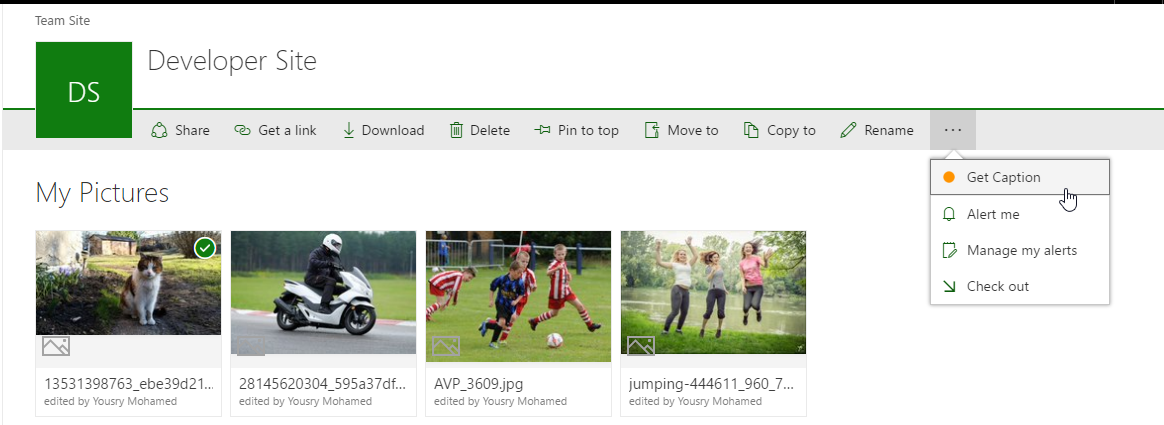
In Office 365, we have something called new list experience with an improved ribbon view. On on-prem environments you might get the old experience but the overall effect is the same. Once you select a picture the ribbon will have a new button called Get Caption. That SharePoint addin simply add a custom action to the ribbon such that when you select a picture you can open a popup/page to predict description.
Do not use the addin now, we will come to that in a minute after some small piece of explanation.
8: Connecting the dots…
So, we did not talk much about how things fit together. Let us have a quick look. SharePoint addin is just a bunch of javascript calls to REST endpoint in SharePoint to load image, grab contents and update some metadata. The prediction part is simply an ajax call into that web API we have in Ubuntu that looks like:
jQuery.ajax({
    url: "http://localhost:5001/api/describe",
    data: formData,
    cache: false,
    contentType: false,
    processData: false,
    type: "POST",
    success: function (result) {
        var options = "";
        for (var i = 0; i < result.length; i++) {
            options += '<option value="' + result[i] + '">' + result[i] + "</option>";
        }
        $("#descriptions").append(options); // never mind appending options with every button click
        $("#selections-section").show();
    }
});
Form data is a javascript object filled with binary data of the image selected. The target POST URL is our web API hosted in Ubuntu. So, if you plan to have something more than a POC you need to make that endpoint available to browsers other than your local dev box. Maybe an Azure VM or onprem machine and then you need to update the URL and secure that web service also.
The web API endpoint for doing the prediction starts with defining a POST endpoint.
// POST api/describe + file attachment :)
[HttpPost]
public ActionResult DescribeIt()
Next we will grab the file uploaded and save it locally somewhere. We should drop it to a temp folder but I am just dropping it to application folder for simplicty.
var webRootPath = _hostingEnvironment.ContentRootPath;
var file = Request.Form.Files.First();
var targetFile = Path.Combine(webRootPath, file.FileName);
WriteFile(file, targetFile);
Once we have our file ready on the local file system on the web API VM, all we need to do is to run a bash script from .net code to do the prediction and come back with the expected description.
var command = "sh";
var myBatchFile = $"{webRootPath}/predictor.sh";
var args = $"{myBatchFile} {targetFile}";

var processInfo = new ProcessStartInfo
{
    UseShellExecute = false,
    FileName = command,
    Arguments = args,
    RedirectStandardOutput = true
};

var process = Process.Start(processInfo);
process.WaitForExit();
var output = process.StandardOutput.ReadToEnd();
We have a file called predictor.sh as part of the web API contents which is also deployed to the publish folder on ubuntu. The file simply contains :
#!/bin/bash
/home/super/models/im2txt/bazel-bin/im2txt/run_inference --checkpoint_path="/home/super/model-data/model.ckpt-2000000" --vocab_file="/home/super/model-data/word_counts.txt" --input_files=$1
So, just double check your environment paths and user name in case you have different values. This file can be generated dynamically or controlled by some config settings but it should be good for our example. It simply does the bash script we did before to do the prediction but this time takes the image path as a parameter. Please also verify that this .sh file has execute permissions on the VM just in case. Also when you clone that repo locally, review the line endings for that file just in case they are converted to CR+LF as Ubuntu will not be happy with anything other than LF only.
Then once we have the prediction text from the bash script process we can just do some text parsing and return it as an array of expected descriptions.
/*
Successful prediction would be :

Captions for image filename.jpg:
0) a group of people sitting around a table . (p=0.010212)
1) a group of people sitting around a table with food . (p=0.001988)
2) a group of people sitting around a table with a cake . (p=0.000799)

*/
if (output.Contains("Captions for image"))
{
    output = output.Substring(output.IndexOf("Captions for image"));
    var lines = output
        .Split(Environment.NewLine[0])
        .Skip(1)
        .Select(a => a.Trim())
        .Where(a => a.Length > 3 && a.Contains("(p="))
        .Select(a => a.Substring(3))
        .Select(a => a.Substring(0, a.IndexOf("(p=", StringComparison.OrdinalIgnoreCase)).Trim())
        .ToArray();
    return Ok(lines);
}
return BadRequest("Cannot predict image description" + Environment.NewLine +  output);
One extra hint, if we are doing the test from our Office 365 SharePoint site which is hosted over HTTPS then we cannot call into an API hosted over HTTP as the browser will be blocking the call due to mixed content. If you still want to try it with such mix, you can open Chrome instructing it to ignore mixed contents like below:
"C:\Program Files (x86)\Google\Chrome\Application\chrome.exe" --allow-running-insecure-content
Another option is to add SSL to nginx if you would like to.
Then comes an extra peice of SharePoint functionality to show the expected descriptions in a dropdown list, allow the user to select one of them and click a button to update the caption column of that image with the selected text.
9: When the rubber hits the road..
For now we have SharePoint addin deployed to Office 365 developer site that contains a picture library with a few pictures uploaded. Also we have our VM running web API that can interact with TensorFlow and do predictions on a ready-made model. So let’s have a look on how things fit together.
- Open Chrome as mentioned above to ignore mixed content checks.
- Navigate to your picture library.
- Select one of the pictures and notice the ribbon will have a new button called
Get Caption
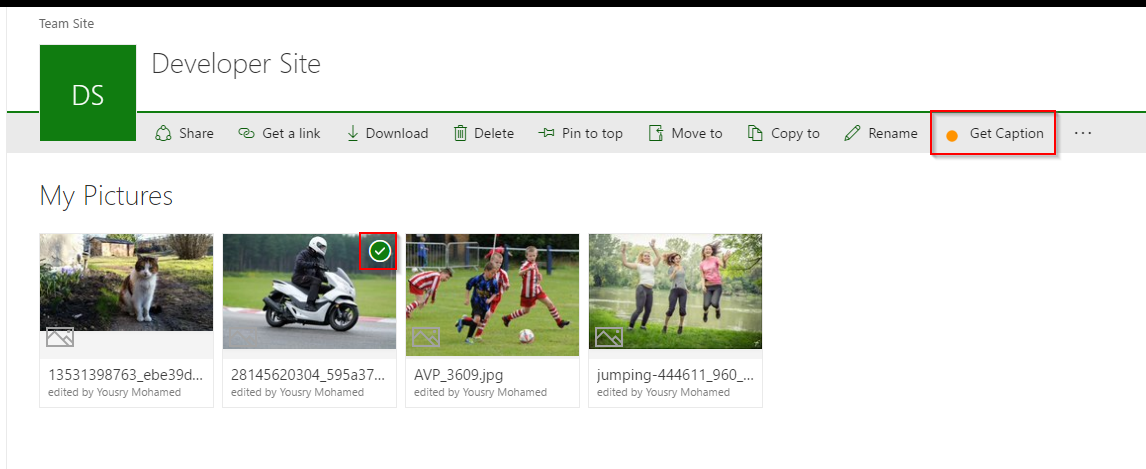 - Click on Get Caption button to open or navigate to the addin page
- You will get a new page with the image and a button named
- Click on Get Caption button to open or navigate to the addin page
- You will get a new page with the image and a button named Describe Image, click it.
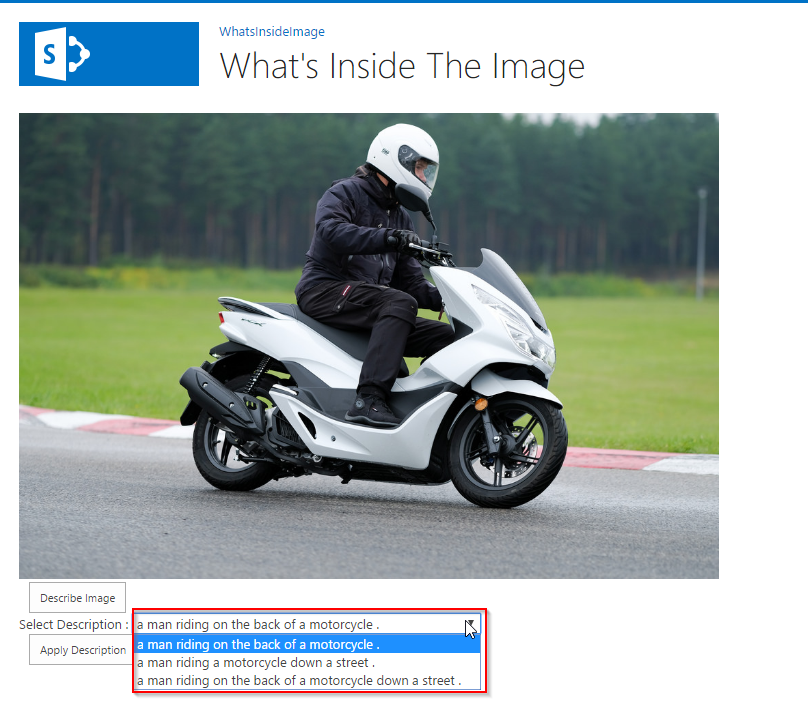 - You will get some descriptions appearing in a dropdown list plus an extra button to apply one of the selected descriptions
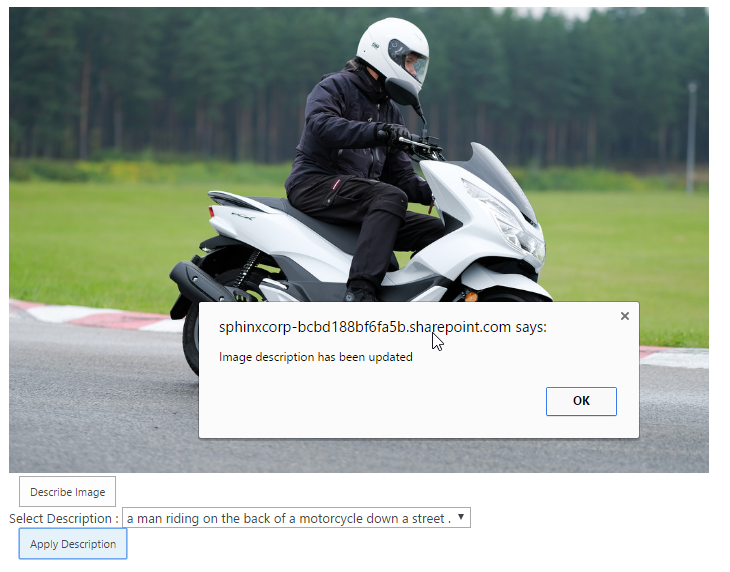
- Select one of the descriptions and click apply, then a success message will be shown. Dismiss the message and click on the link in the top left menu bar to navigate back to the site containing the library.
- You will get some descriptions appearing in a dropdown list plus an extra button to apply one of the selected descriptions
- Select one of the descriptions and click apply, then a success message will be shown. Dismiss the message and click on the link in the top left menu bar to navigate back to the site containing the library.
 - Go back to the picture library and click the image we just captioned to open it in the viewer mode and click the litte info button in the top right. You should see the selected description copied into the Caption field of the image.
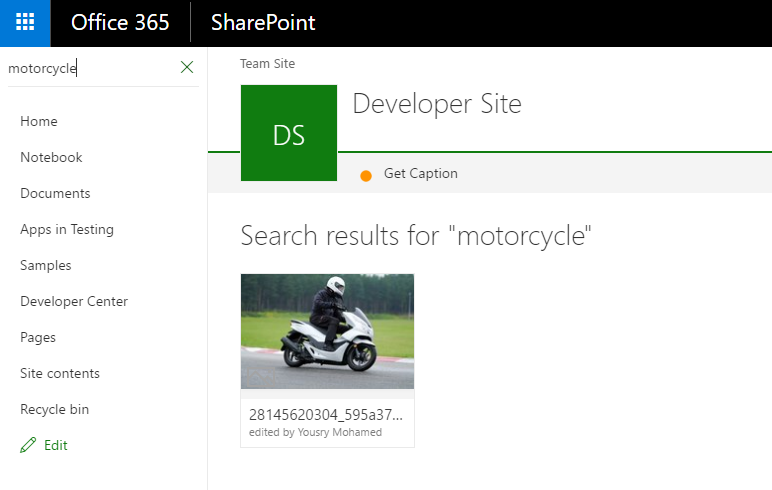
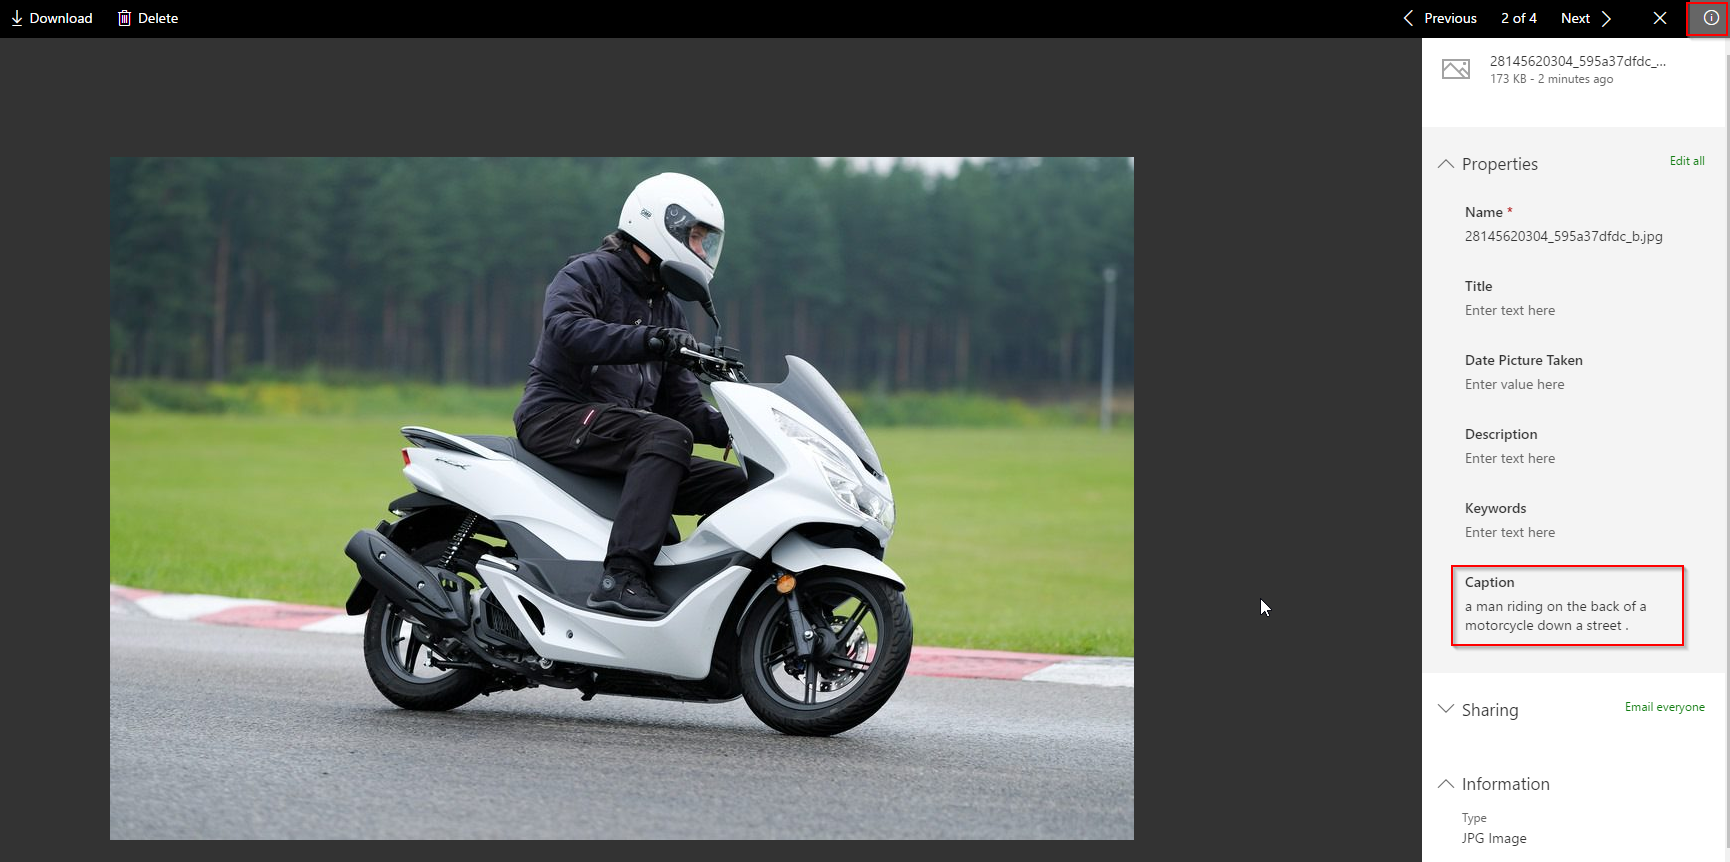 - Now if you wait a few minutes and search for one of the keywords of the caption selected for that image, you should get the image back as part of the search result even if the image file name does not contain the keyword. We have successfully created image searchable metadata using TensorFlow.
Other ideas/ Troubleshooting tips
- It seems that the inference script built using bazel only supports JPG files. I tried with some PNG but it did not work. This is just a guess but could be easily verified and worst case images could be converted before calling the final prediction endpoint. There are even some libraries to do that on the client side.
- The solution implemented is very simplistic to have something running quickly. Actually for TensorFlow, the production way of doing predictions is to use something called TensorFlow Serving but this would be too much for the first adventure. Also we can use SharePoint remote event receivers to automate the process or maybe allow the user to edit the description to correct/enrich it.
- Web API project has also to be configured to allow CORS calls and currently it is accepting all domains, have a look on source code if you would like to limit it to certain domains. Without this CORS configuration, AJAX calls from browsers/user agents will not be able to access it.
- When testing keep fiddler running to check stuff like CORS/Firewall Access/Mixed Content/Network calls